Step into any well-loved garden and you’ll often find a quiet little companion at the back: the shed. It might store muddy boots and terracotta pots, or cradle your favourite tools and half-finished DIY dreams. Yet there’s one hidden detail that will decide whether your shed becomes a dry, dependable retreat… or a damp, musty headache.
That quiet hero is roof ventilation.
If your shed smells a little earthy, if you’ve noticed beads of moisture on the inside of the roof, or if tools rust faster than you can say “spring clean”, your roof is probably begging for a breath of fresh air. Let’s look at how to give it exactly that – gently, efficiently, and in a way that helps your garden building last for many seasons to come.
Why roof ventilation matters more than you think
A garden shed has a simple life but a harsh one. It sits outside, facing rain, frost, blazing sun and sudden temperature changes. Inside, we store wood, cardboard boxes, fabric, metal tools – all materials that hate moisture and stale air.
Without good roof ventilation, a shed easily becomes:
- Damp – Condensation collects on the colder inner surface of the roof and walls.
- Mouldy – Spores settle on timber, cardboard and fabrics, feeding on trapped moisture.
- Unhealthy – Mould and mildew affect allergies and breathing, especially in small spaces.
- Short-lived – Persistent moisture leads to wood rot, warped boards and peeling paint.
Proper roof ventilation solves a surprisingly long list of problems with one simple habit: it lets your shed breathe.
By allowing fresh air to enter low down and warm, humid air to escape high up, you create a gentle airflow that keeps the structure dry, healthy and far more resilient.
Understanding moisture in garden sheds
Before we talk vents and gables, it helps to understand where all this moisture comes from. After all, you’re not running a shower in there, so why does it feel so damp?
In a typical shed, moisture is introduced by:
- Weather – Rain, morning dew and damp ground all raise humidity around the shed.
- Everyday use – Wet tools, muddy boots, damp garden furniture and plant pots bring moisture inside.
- Temperature changes – On cool nights, warm air inside meets a cold roof surface and condensation forms, just like on a bathroom mirror.
Because sheds are small, even a little moisture has a big impact. If that humid air has no easy way out, it will sit under the roof, slowly soaking into timbers, cardboard boxes and anything fabric you’ve stored away “just in case”.
Roof ventilation interrupts this cycle. It gives that damp air an elegant escape route and helps your shed stay as crisp and dry as a well-aired linen cupboard.
Key principles of effective shed roof ventilation
Whether your shed is tiny and rustic or a spacious garden studio, the principles are the same. Think of ventilation as a quiet conversation between indoors and outdoors: air comes in, air goes out, and the space feels instantly more alive.
There are three essential ideas to keep in mind:
- Intake and exhaust
Fresh air should enter low down (intake), while warmer, humid air escapes higher up (exhaust). Heat naturally rises, so your roof is the perfect escape hatch. - Cross-ventilation
Ideally, air should be able to travel across the space. For example, vents on opposite sides of the shed, or a combination of wall and roof vents, create a gentle flow rather than a dead corner where moisture lingers. - Balance
You don’t want a gale inside your shed. The goal is steady, moderate airflow – enough to keep the space dry without making it draughty or vulnerable to driving rain.
Once you understand these basics, the rest is simply about choosing the right type of vent and placing it thoughtfully.
Types of roof ventilation for sheds
There is no single “correct” system; instead, you’ll choose a combination that suits your shed’s size, shape and use. Here are the main options, with their strengths and ideal uses.
Ridge vents
Ridge vents run along the highest point of the roof, allowing warm air to escape at the very top of the shed.
- Best for: Larger sheds and garden rooms with pitched roofs.
- Pros: Very effective at removing rising warm air; discreet and visually neat.
- Considerations: Slightly more complex to add to an existing shed; best done when building or re-roofing.
Roof vents (fixed or mushroom vents)
Small, dome-like or low-profile vents installed directly in the roof surface.
- Best for: Existing sheds where you can’t easily alter the ridge.
- Pros: Good targeted exhaust; can be added later with careful sealing.
- Considerations: Must be well flashed and sealed to prevent leaks; usually paired with wall vents for intake.
Soffit or eave vents
Located under the roof overhang, these provide discreet intake vents along the lower edges of the roof.
- Best for: Sheds with a noticeable roof overhang.
- Pros: Hidden from view; excellent for drawing fresh air in low down.
- Considerations: Work best as part of a system with ridge or roof vents higher up.
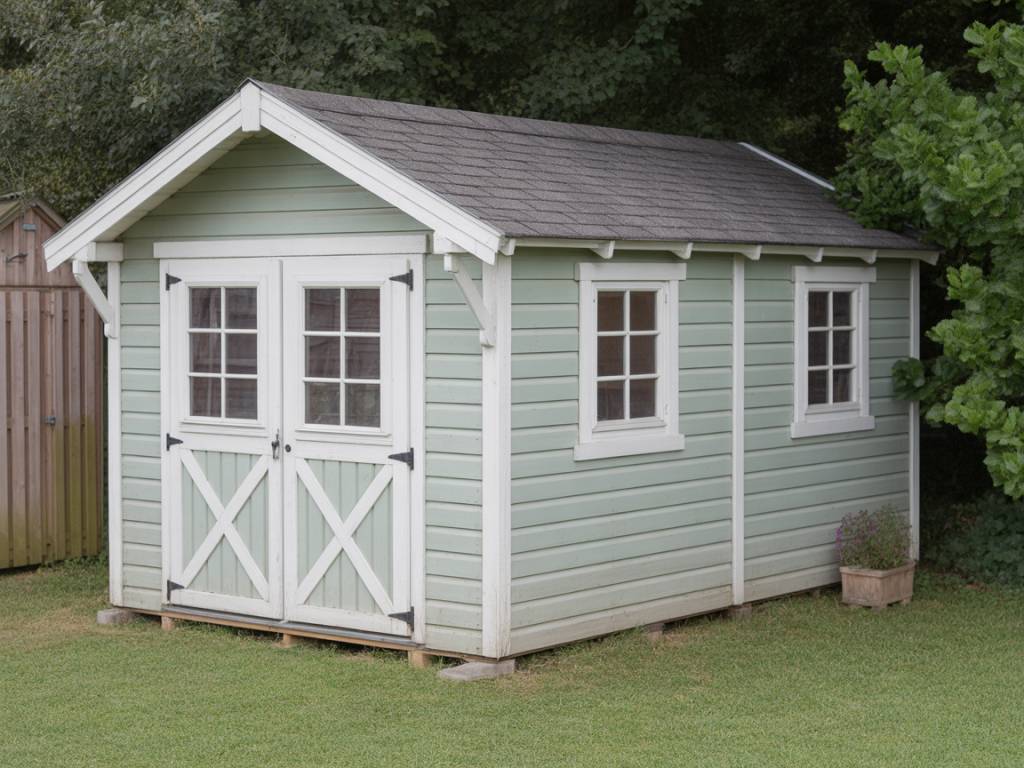
Gable vents
Installed high on the end walls (the triangular part under a pitched roof), gable vents help air move horizontally through the roof space.
- Best for: Classic apex sheds and timber workshops.
- Pros: Easy retrofit option; adds a charming, traditional look.
- Considerations: Less effective on their own than when combined with roof vents; need insect mesh to keep pests out.
Opening rooflights or skylights
An operable skylight can act as both a light source and a ventilation point.
- Best for: Garden studios, potting sheds and craft spaces used frequently.
- Pros: Dual purpose – light and ventilation; lovely for spaces where you spend time.
- Considerations: More expensive than simple vents; must be properly sealed and flashed.
Passive vs. powered ventilation
Most sheds do perfectly well with passive ventilation – vents that rely on natural air movement rather than electricity. If your shed is large, insulated, or used as a workshop, a small solar-powered roof fan can help move warm air out efficiently, particularly in summer.
Planning roof ventilation in a new shed
If you’re at the dreamy planning stage of a new garden building, this is the perfect moment to weave ventilation into the design. It’s simpler, cleaner and often cheaper to get it right from the beginning.
Here’s what to think about before the first board is nailed:
- How you’ll use the space
A simple storage shed needs less airflow than a potting shed full of damp compost, or a craft studio where you might be painting or sanding. More moisture and more time spent inside both call for better ventilation. - Roof pitch and shape
A steeper pitched roof works beautifully with ridge vents and gable vents. Flat or very low-pitched roofs may need low-profile roof vents and careful planning to ensure water still runs off properly. - Balance intake and exhaust
For most garden sheds, you might combine:- Intake: Soffit vents or small louvred vents low on the side walls.
- Exhaust: Ridge vent or high-level roof vents.
This simple pairing keeps air slowly moving through, even on windless days.
- Orientation and weather
Consider your garden’s prevailing winds and the direction of driving rain. Place intake vents where they’re sheltered if possible, and ensure exhaust vents are well protected with overhangs, baffles or hoods.
When ventilation is built-in rather than added as an afterthought, the entire shed feels more intentional – a small, practical building that quietly looks after itself.
Retrofitting ventilation in an existing shed
If your shed is already standing and showing signs of moisture, don’t worry. With a gentle afternoon’s work and a few careful cuts, you can dramatically improve the air quality inside.
Start by reading the space:
- Is condensation forming on the underside of the roof?
- Do the walls feel damp or cool to the touch?
- Is there a musty smell when you first open the door?
If you’re nodding along to any of these, consider this simple retrofit approach.
Step 1: Create high-level exhaust
Choose one of the following, depending on your roof style and tools:
- Add a small roof vent near the ridge on one or both sides.
- Install a gable vent high up on each end wall.
Always add insect mesh or choose vents with built-in grilles so that fresh air arrives alone – without spiders or wasps.
Step 2: Provide low-level intake
Once air has a way out, it needs a gentle way in. Otherwise, you create a vacuum rather than a flow.
- Fit small louvred vents near the bottom of the opposite walls.
- Use trickle vents in the door if it’s being replaced anyway.
Position intake vents where they’re less exposed to driving rain. Under a small canopy or porch can work beautifully.
Step 3: Check the roof and walls for hidden leaks
Ventilation helps with humidity and condensation, but it can’t fix a leaking roof. While you’re adding vents, take the opportunity to:
- Inspect felt or shingles for tears, cracks or missing pieces.
- Check around old nails and screws for tiny gaps where water can creep in.
- Seal any suspect areas with appropriate roofing sealant.
With these small interventions, many tired, musty sheds feel transformed – lighter, drier and suddenly far more welcoming.
Seasonal care: tailoring ventilation to the weather
Your shed doesn’t live in a vacuum; it lives in your garden, under your particular sky. Paying attention to the seasons helps you adjust your ventilation habits for the best results.
In winter
- Keep vents open.
It feels counterintuitive, but sealing everything up tightly often traps more moisture inside. Gentle winter airflow is your ally against condensation. - Avoid blocking vents with stacked items.
That pile of spare timber leaning against the wall? It might be smothering your best airflow.
In summer
- Encourage daytime airing.
On dry days, open the door or a window to work alongside your roof vents, especially if you’ve been potting plants or painting. - Consider extra shading.
If your shed bakes in full sun, a small pergola, climbing plant or shade sail can keep the roof cooler, reducing heat build-up and helping your vents work more gently.
In spring and autumn
- Do a quick “breathe test”.
Step inside, close the door for a moment and pay attention. Does the air feel fresh or slightly heavy? Your senses are surprisingly good at noticing when ventilation needs a little boost. - Inspect vents annually.
Brush away cobwebs, leaf debris or paint drips. A clear vent is a quiet but powerful guardian.
Common mistakes to avoid
Sometimes, with the best intentions, we make choices that secretly work against our sheds. Here are a few gentle “don’ts” that can save you a lot of frustration.
- Blocking the natural airflow
Stacking boxes right up to the roof, or building deep shelves across gable ends, can interrupt the path air needs to travel. Try to keep a little breathing space around vents and under the roofline. - Over-insulating without ventilation
Insulation is wonderful if you use your shed as a studio or workshop, but it must be paired with ventilation. Otherwise, you create a warm, sealed box where moisture is trapped – perfect for mould, disastrous for timbers. - Using non-breathable interior linings
Plastic sheeting stapled to the inside of the roof might seem protective, but it simply relocates condensation. If you do line the interior, choose breathable materials and always include a vapour-permeable layer and vents. - Relying only on gaps and “natural draughts”
Old sheds often have accidental ventilation where boards don’t quite meet. It’s tempting to think “that’s enough”, but these gaps are random and uncontrolled. A couple of well-placed vents always perform better than hoping the wind finds its way in.
Creating a shed that feels good to step into
Beyond the practicalities of timber and tools, there’s a small, satisfying moment when you open a shed door and are greeted by air that feels… right. Not too cold, not musty, not thick with last winter’s damp. Just gently fresh.
Roof ventilation is one of those invisible details that gives you that feeling. It turns a simple storage space into a dependable garden companion – a place where your favourite trowel stays rust-free, where seed packets remain crisp and readable, and where a wooden potting bench can age gracefully rather than decay quietly.
If you’re designing a new garden building, let ventilation sit beside colour and cladding in your planning. If you’re working with a faithful old shed, a few thoughtful vents can be all it needs to feel renewed.
After all, your shed is part of the story of your outdoor space: the backstage area of every picnic, every newly planted border, every vase of garden flowers brought indoors. Giving its roof the ability to breathe is a small kindness that pays you back, season after season, in a dry, healthy and long-lasting garden retreat.